

Ever wonder how online retailers get their product images looking perfect? You don't need to invest hundreds of dollars in a digital camera and you do not need to have any photography experience to take professional photographs of your products.
One of the biggest mistakes we see for those just starting out with an online store, is having poor product images. Amy has posted a great tutorial that takes only a few minutes, and costs less than $5.00 and will have your products looking like they're ready to jump off of the page.
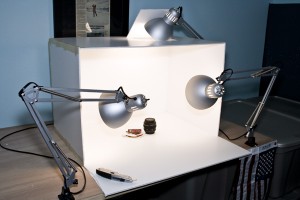
Here are some things to keep in mind when taking pictures of your products:
- Disable your camera’s built-in flash when taking a photo. The built-in flash produces a glare on the photo and makes your products look two-dimensional.
- Use your camera’s “Macro Focus” feature to take close-ups of your product.
- Use a tripod when taking pictures of your product. The tripod stabilizes your camera and eliminates blurry photos.
- Photograph your products at an angle.
- Take more than one photo of each item.
- Understand how your camera works. Take a few test photographs and rearrange your lighting or the product if you have to. Read your user manual and find out how to customize the white balance feature on your camera, which will control the background. Also figure out how to set the ISO and start at 100 or 200. This controls the amount of light entering the lens.
- NEVER rush on this part of your store design. you can have a stellar online store, and if your product pictures look like they were taken with a camera phone, you'll see poor sales.
To learn more, read the The Complete Guide to Building a Photography Studio from Pixpa.


Leave a reply or comment below